Wednesday 26 June 2019

Lemon Ricotta & Almond Cake


I'm not sure where I got this super delicious recipe from originally as it's written on a scrap piece of paper that has been kept inside one of my most used cookbooks for a few years. So apologies for not crediting the original recipe writer. So, if like you me you love lemon, ricotta and almond then this is the cake for you. Not too sweet and tastes even better a few days after you've made it. Enjoy with a cup of tea.

120g unsalted butter, softened
240g caster sugar
1 vanilla bean, split and seeds scraped
1/4 cup lemon zest 
4 eggs, separated
240g almond meal
300g ricotta
Flaked almonds, to decorated
Icing sugar, for dusting

Heat oven to 160°C.

Line the base and sides of a 20cm round cake tin with baking paper.

Beat butter, 165g of the caster sugar, vanilla seeds and lemon zest in an electric mixer until pale and creamy. Add the egg yolks, one at a time, continuing to beat until fully combined (scrape down the sides of the bowl between each addition). Add the almond meal and beat to combine. Fold in the ricotta.

In a separate bowl, beat the egg whites until soft peaks form. Gradually add the remaining sugar and whisk until stiff peaks form. Gently fold a third of the egg whites into the cake mixture. Repeat with the remaining egg whites.

Pour mixture into the prepared cake tin and decorate the top with flaked almonds. Bake for 1 hour or until cooked and firm to touch. Allow to cool completely in the cake tin. Dust with icing sugar to serve.


SHARE:

Monday 16 July 2018

Chocolate Chip Cookies


Whether you're five or forty-five choc-chip cookies are always a hit. This recipe is super easy, quick and made in one bowl so cleaning up is minimal. They're great for breakfast, lunchboxes or with a cup of tea or glass of milk.

125g butter, softened
1/2 cup brown sugar
1/3 cup caster sugar
1 egg
1 teaspoon vanilla
1 1/2 cup self raising flour
3/4 cup dark chocolate chips

Pre-heat oven to 160C. Line a baking tray with baking paper.

Beat butter and sugars until light and creamy. Add egg and vanilla and beat until just combined. Stir in flour and chocolate chips.

Roll tablespoons of the mixture into balls and place on the tray. Bake for 10-15 minutes until golden. Allow to cool slightly before moving to a wire rack.

SHARE:

Thursday 5 July 2018

Ultimate Chocolate & Raspberry Tart


To celebrate World Chocolate Day (arguably my favourite day of the year) on Saturday 7 July, I thought I'd make Jamie Oliver's Chocolate Raspberry Tart. This recipe is delicious and super rich so goes a long way, and it's surprisingly easy to make. Seriously the best chocolate tart EVER.

Chocolate Pastry:
200g plain flour, plus extra for dusting
25g cocoa powder
25g icing sugar
175g cold butter
1 egg yolk
1 teaspoon vanilla extract

Chocolate Filling:
500ml double cream
75g caster sugar
300g dark chocolate (70% cocoa solids)
2 eggs

250g raspberries, plus extra to serve 

Pre-heat oven to 200C /180C fan-forced.

For the pastry, add the flour, cocoa powder, icing sugar and butter to a food processor and process until the mixture resembles fine breadcrumbs. Add the egg yolk and vanilla extract and process until the mixture starts to stick together. Turn onto a lightly floured surface and knead until smooth. Cover with cling film and chill in the fridge for 15 minutes.

Remove pastry from fridge and roll out thinly on a lightly dusted surface. Line a 25cm loose-bottom tart tin. Trim the edges and chill in the fridge for a further 30 minutes.

Line the pastry case with a sheet of baking paper and rice or baking beans and blind bake for 15 minutes. Remove paper and rice/beans and blind bake for a further 5 minutes. Remove from oven and cool.

Turn oven down to 170C / 150C fan-forced.

For the filling, add the cream and sugar to a saucepan and slowly bring to the boil, stirring gently until sugar dissolves. Take off the heat and add the chocolate, stirring until smooth. Cool slightly, add the lightly beaten eggs and mix well.

Scatter the raspberries into the tart case, pour over the chocolate filling and bake for 20-30 minutes until the filling is cooked but still slightly wobbly (it will continue to firm as it cools). Remove from oven and cool until set.

Serve with a few extra raspberries and cream.
SHARE:

Tuesday 26 June 2018

Baby Essentials

Sofia is almost six months old - where has the time gone?! Foolishly, I thought I'd have more time at home with a baby, I thought I'd be taking photos and be blogging but I haven't had time, and any time I have had between our feeding/playing/sleeping routine I've found myself cleaning, preparing meals (although most of mine are eaten sitting on the floor) or reading up on things like 'sleep regression', 'starting solids', 'how do you get poop out of carpet' etc. I have LOVED every second of being a mama, it's more than I ever imagined, and I revel in seeing Sofia grow and experience new things.

Six months in and I've also realised where I wasted money (on cutesy, unnecessary things that remain unused) and discovered a number of things that I'd recommend for all new mama-to-bes. These have made our lives much easier in the last few months so I thought I'd share my 'essentials' with you.  Note, we've just started solids so I'll do a separate post on this as Sofia has taken to it like a duck to water.

Ubbi Nappy Caddy
This has been so handy - providing convenience and access to all our nappy supplies in any room in the house. There are two main compartments for nappies, wipes and creams and a draw for smaller items. It also comes with an easy clean change mat. I'd be lost without this.
Ubbi Nappy Caddy RRP $79.95 (currently half price on The Stork Nest).

UPPABaby Cruz Pram
We looked at almost every pram on the market. The Bugaboo is always a popular choice but didn't have a large shopping basket underneath (priorities) so we decided on the UPPABaby which has a huge, easy to access shopping basket underneath. Our next decision was choosing between the VISTA and the CRUZ models. The VISTA is designed for growing families as you can add another seat and the CRUZ is designed just for one baby. Given the struggles we had trying to get pregnant with Sofia, we decided to buy the pram for the baby we were having, not for future babies that may or may not eventuate, so we settled on the slightly more compact CRUZ model which is sturdy, looks great and can navigate over anything. We also bought the bassinet which was great for the first 5 months as she slept in there a lot and it prevented me from feeling housebound.
UPPABaby Cruz Pram
UPPABaby Bassinet
The First Six Weeks - Midwife Cath
This book literally got me prepared, and through, the first six weeks with Sofia. As a first time mum it provided guidance about caring for our new baby, from feeding to sleeping and everything in between. With over 40 years experience, Cath provides a wealth of knowledge into babies, establishing routines and a lifelong loving bond. I read it before Sofia was born and then read each week (it's set out in weeks) as I was going through them and found it really got me through the challenges of the first few weeks. If only Cath could write one for the first 6 years!!
The First Six Weeks by Midwife Cath $29.99


Love to Dream Swaddle UP
Sofia didn't want to be 'traditionally' swaddled with her hands down from birth so we were thrilled to discover the Love to Dream Swaddle UP. They've provided both Sofia and us with a great nights sleep - something all new parents need.  These also make the perfect baby shower gift!
Love to Dream Swaddle UP Original $39.95


White Noise Sound Machine
This goes hand in hand with the Love To Dream SwaddleUP in promoting sleep. It plays white noise that calms and soothes and also drowns out other household noise whilst baby sleeps. This one is great as it's portable so can be taken on holiday or fastened to a pram or car seat.
Marpac Hushh White Noise Sound Machine $31
Stokke Tripp Trapp
I knew without question I wanted the Tripp Trap highchair as I had one as a kid - they grow as your child grows and you can choose a colour to work with your decor (we got white). We also got the additional newborn set so we could bring Sofia to the table at mealtimes from early on. That way she got used to being at the table and it's made her transition to solids much easier.
Stokke Tripp Trapp Highchair $329

Baby Bjorn Bouncer
I wasn't sure if we needed one of these at first, so held off a few weeks and then I realised I need to put Sofia somewhere when I was having a shower, going to the toilet or making dinner. Portable and light you can move it around the house so your little one can see you at all times.
Baby Bjorn Bouncer $219

Baby Sleeping Nest
People either love or hate these and there was some controversy about using them as I believe some people use them inside the cot which isn't great for SIDs. We however, just used ours for day naps in the first 4 months or until Sofia's head was touching the top. I kept ours on our lounge room floor and Sofia LOVED sleeping in it, and it meant I could keep an eye on her during the day whilst I went about with my chores.
Cam Cam Baby Nest $159

SHARE:

Thursday 4 January 2018

Moroccan Cauliflower and Freekah Salad


This salad is a firm favourite in our household - we enjoy it on it's own, as a side and we often take any leftovers to work for lunch.

1 Cauliflower, leaves discarded 
1 teaspoon ground cumin
1 teaspoon ground coriander (or you could use Moroccan Spice in place of these two spices)
1 Lemon
1 cup Freekah
1 teaspoon Vegetable stock powder (optional but I think adds a little flavour to the freekah)
1/3 cup sultanas or raisins
1/4 cup Flaked almonds, toasted
1/4 cup Pepitas, toasted
1/2 bunch mint, finely chopped
1/2 bunch parsley, finely chopped
3 Spring onions, finely sliced 
1 tablespoon Olive oil
Splash of red wine vinegar
Salt & Pepper, to taste

Pre-heat oven to 200C. Place the whole cauliflower on a backing tray, sprinkle with cumin and coriander and roast for 30-40 minutes. Remove from oven and squeeze over juice of the lemon. Once cooled slightly break into florets.

While the Cauliflower is roasting, cook the freekah. Add freekah and vegetable stock to a small saucepan with 3.5 cups of water. Bring to the boil, reduce heat and simmer for 20-25 minutes until water is absorbed (you can drain any excess). Transfer cooked freekah to a bowl or serving plate to cool slightly.

To assemble, add sultanas, pepitas, almonds, cauliflower, mint, parsley and spring onion to the freekah. Drizzle with the olive oil, splash of red wine vinegar and season to taste. Toss and serve. 
SHARE:

Monday 25 December 2017

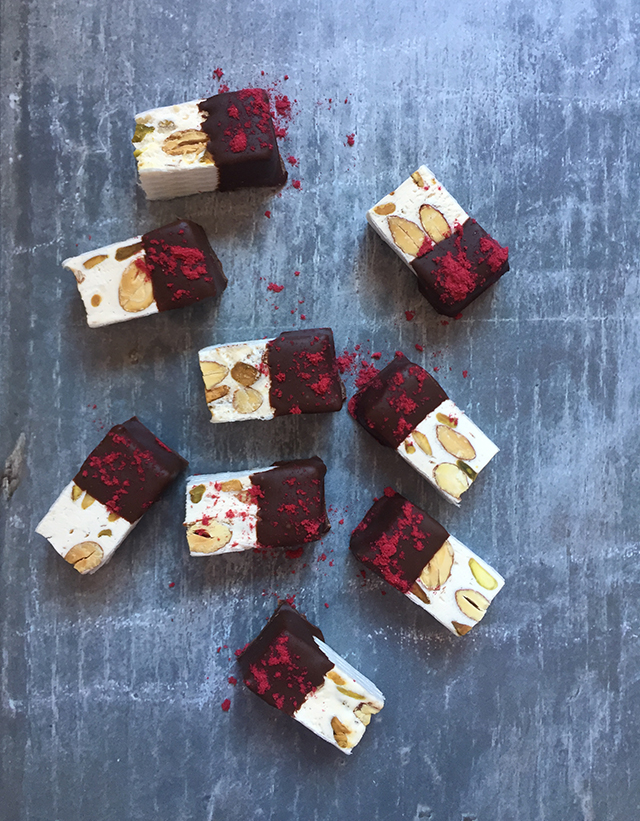
Chocolate Dipped Nougat


This is the most simple sweet treat to serve at Christmas, after dinner or just when you need to whip up something quick ahead of time so you can stress less, sit back and celebrate. It takes about 10 minutes to prepare, plus time for chilling.

Store bought nougat
Dark Chocolate, melted
Freeze dried raspberry powder*

Cut the nougat into 2cm pieces, dip into chocolate half way and place on a baking sheet lined with baking paper. Sprinkle with freeze dried raspberry powder and refrigerate until set.

*Most good delis/speciality stores sell freeze dried raspberries. If you're in Melbourne, Essential Ingredient stocks it.
SHARE:

Friday 22 December 2017

Dressing a Bump

During pregnancy I haven't wanted to waste money on bump-friendly maternity clothes that would only last a couple of weeks (I've preferred to waste money on impractical baby clothes and accessories that will be covered in poop and vomit in no time!). I have however bought a few key pieces that have really got me through.

Topshop Maternity Jeans: Topshop Maternity Jeans are fabulous. I grabbed two pairs - Jamie and Leigh styles - both over the bump and super comfortable. I found my normal size was fine as they have lots of stretch. They looked just like my old jeans that no one know I was even in maternity jeans and some of my friends thought they looked so good that they were even eyeing them up! It will be very hard to go back to normal jeans.


Midi Tube Skirts: Whilst I would never have dreamed to wear a tight tube skirt pre-pregnancy, I have found them perfect for pregnancy as they hit my leg at the thinnest part and hugged in the expanding belly and bum.


Cos Shirts: Cos has become my new best friend. I've found their pieces, even in my pre-pregnancy size, not only flattered a growing bump but I'll be able to wear them once (if) my waistline reappears.


Fancy Flats: Gone are the days of wearing high heels (I still sneak a few in sometimes) and in came the flats. I found a few statement flats really elevated my wardrobe. I have worn my Valentino rock studs to death (and while pricy my cost per wear is right down) but I also wore a lot of ASOS flats that were $28 or less.


Maternity Tees: I have lived in maternity teas that I've simply warn with jeans/trousers (and a fancy pair of flats) or knotted above my bump with a tube skirt. I didn't spend a fortune - ASOS had 3 packs for $30 and they've seen me through 9 months.

SHARE:
© A Little Slice Of. All rights reserved.
BLOGGER TEMPLATE MADE BY pipdig